
![]()
Introduction
This document explains how to initially configure your SSL Live console for use with a Dante audio network.
Before starting to configure your console it's important to understand that your SSL Live console contains five separate network devices which must be configured to work with your external Dante network for correct operation. These devices are:
Primary Dante Control Network
Primary Dante Audio Network
Secondary Dante Control Network
Secondary Dante Audio Network
Connectivity Network
While the Connectivity network, which is accessed through one of the three ports labelled NETWORK on the rear of the console, is not required for Dante operation it is important to be aware of its configuration, as if set incorrectly, could conflict with your Dante network. This is discussed in more detail later in this document.
The Live console ships from the factory with the following IP address settings:
Network Interface | Fixed/DHCP | IP Address | Configured using |
Primary Dante Control Network | Fixed | 10.101.x.x | Console Network Options |
Secondary Dante Control Network | Fixed | 10.102.x.x | Console Network Options |
Primary Dante Audio Network | Fixed | 10.101.x.x | Audinate Dante Controller software |
Secondary Dante Audio Network | Fixed | 10.102.x.x | Audinate Dante Controller software |
Connectivity Network | DHCP | - | Console Network Options |
For each IP address above, the subnet mask is 255.255.0.0
Step 1: Setting the Dante Control Network IP addresses
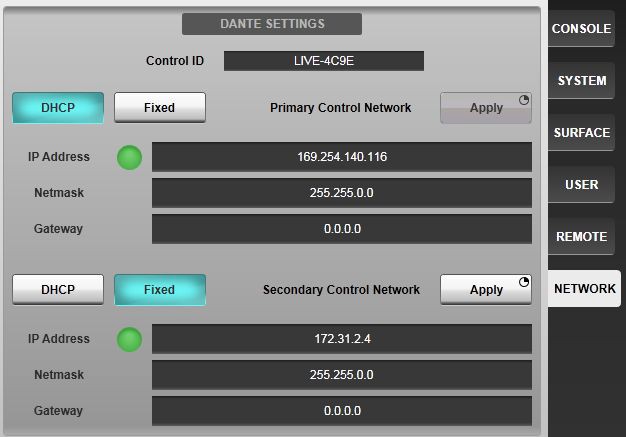
On the console locate to Menu > Options and then select the NETWORK tab.
The screen will show you information for the Connectivity network on the left and the information for Primary and Secondary Dante Control Networks on the right.
Note: These addresses are for the network adapters used by the console to send control data to the Dante network, not the address of the Dante audio connections. You do not see these IP addresses in the DANTE CONTROLLER application.
For our example we are going to set the Primary Control Network with the following settings: IP Address: 10.101.10.21
Netmask: 255.255.0.0
Gateway: 0.0.0.0
First set the port type to Fixed, then double-tap the IP Address and Netmask boxes and enter the values above. Once this is done, press and hold the Apply button and wait for the network adapter to restart.
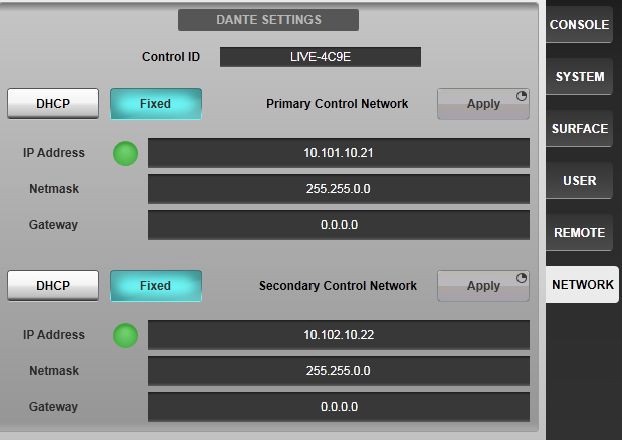
Next set the Secondary Control Network with the following settings:
IP Address: 10.102.10.22
Netmask: 255.255.0.0
Gateway: 0.0.0.0
In our example, the Connectivity network address settings should be left as DHCP. If this needs to be set to a Fixed IP address at a later date, ensure that a different subnet is used to that of the Dante networks.

The Connectivity network is used to connect a PC or tablet running the SSL SOLSA application. The PC connecting to the console will need to have its IP address set in the same subnet in order to communicate with the console.
Step 2: Setting the Dante Audio Network and Dante Control Network names
To easily identify the console on a Dante network the console uses two unique, user defined names:
CONTROL ID - Identifies the Dante Control Network
DANTE DEVICE NAME - Identifies the Dante Audio Network It is important that these two names are NOT the same.
The Control ID name can be seen in the NETWORK page. In the example below the Control ID is

The name of the Dante Audio Network can be set in the IO page, Menu> Setup>IO, by selecting the Dante Expander icon, and then double-tapping the Device name slot and typing the name using the on-screen keyboard. Setting the name of the Dante (Brooklyn) module is done in Dante Controller.
In the example below the Dante Device Name is SSL-L300-1.
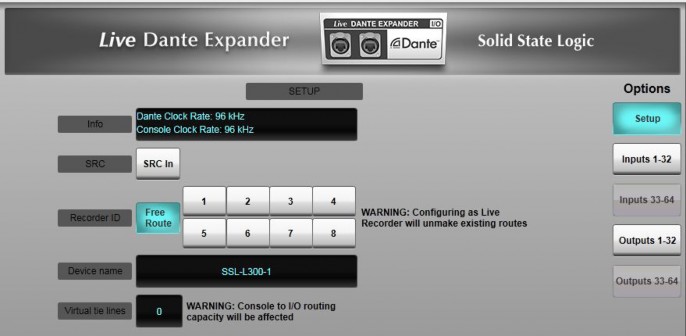
For our example please ensure the Virtual Tie Lines value is set to 0.
Step 3: Setting the Dante Audio Network IP addresses
To set the IP addresses of the console's Dante Audio Network devices you will need a computer running Audinate's Dante Controller application, which you can download here:
https://www.audinate.com/products/software/dante-controller
Set your computer's network port to have a fixed IP address of 10.101.10.100, with a subnet of 255.255.0.0. Now connect your computer's network port directly to the Dante Pri port on your console and launch the Dante Controller application.
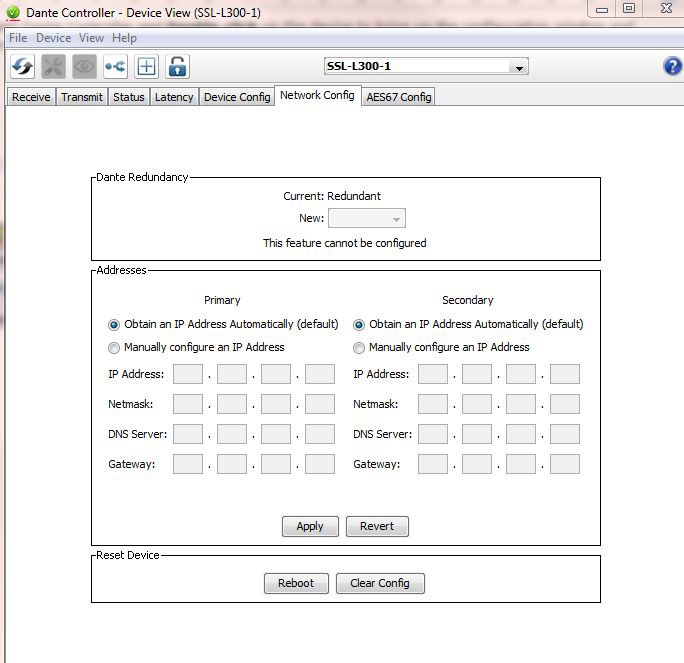
In Dante Controller find the console, in our example SSL-L300-1, (on initial setup this name will be different), and double-click on the console name to open the Device View tab.
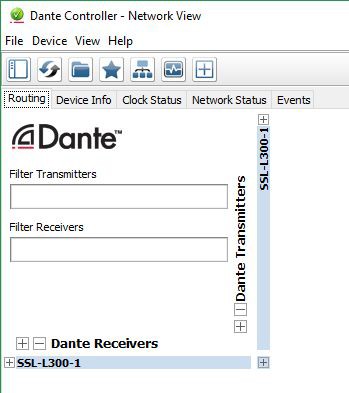
In Device View select the Device Config tab.

Confirm that the name shown in the Rename Device field matches the Dante Device Name exactly. If the name is different, enter the Dante Device Name correctly and click Apply. In our example you can see the name is SSL-L300-1.
In our example make sure the Dante device Sample Rate is set to 96kHz as shown above.
Next select the Network Config tab. This page shows the IP addresses for the console's Dante Audio Network devices.
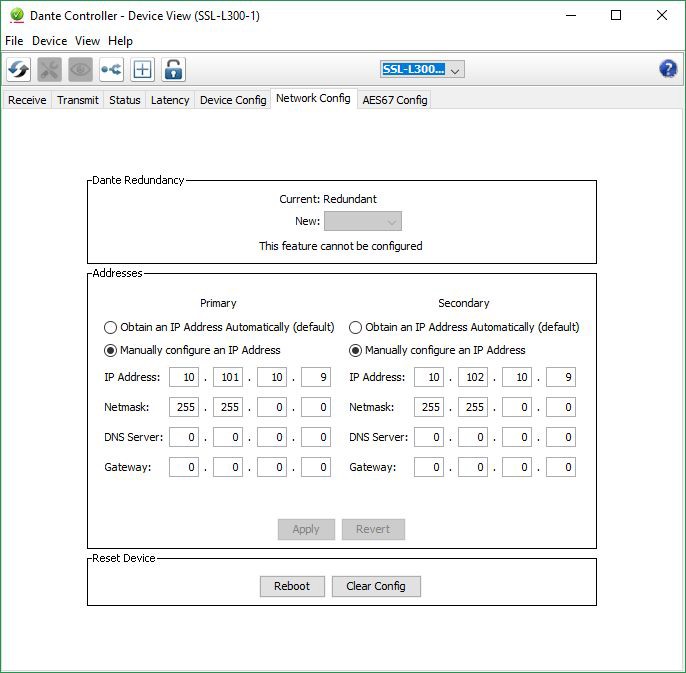
For our example we will use the following IP address settings for the Primary port: IP Address: 10.101.10.9
Netmask: 255.255.0.0 For the Secondary port use:
IP Address: 10.102.10.9
Netmask: 255.255.0.0
Press Apply for the changes to take effect.
Step 4: Connecting SSL Network IO Stageboxes (and other Dante Devices)
Now you have configured your console's Dante settings we can start to add network switches and other Dante devices to the network.
Note: The Primary and Secondary networks must remain physically separate at all times.
All SSL Stageboxes ship configured DHCP. To setup a Fixed IP address on a Stagebox connect your computer (configured to use a DHCP address), directly to the stagebox and use Dante controller to set the Fixed IP address. Repower the stagebox after any IP address change.
So for our example any device connected to the Dante Primary network must have an IP address as follows:
IP Address: 10.101.10.x Netmask: 255.255.0.0
Note: We have already used IP addresses 10.101.10.9, 10.101.10.21 and 10.101.10.100 on the Primary Network.
For the Dante Secondary network any connected device must have an IP address as follows: IP Address: 10.102.10.x
Netmask: 255.255.0.0
Note: We have already used IP addresses 10.102.10.9 and 10.102.10.22 on the Secondary Network.
Using Dante Controller set all connected Stageboxes to 96kHz sample rate.
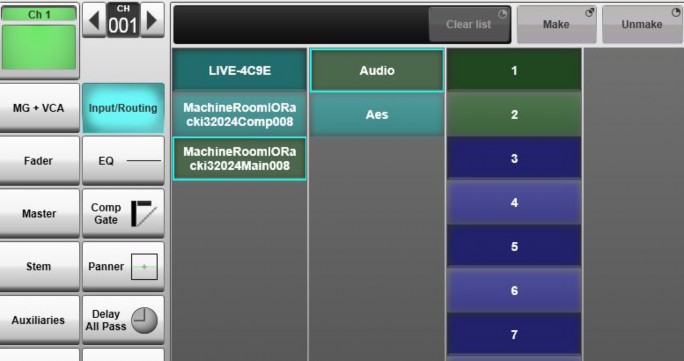
Step 5: Adding external Dante devices to your Routing menu
The Dante Expander is capable of carrying a maximum of 64x64 channels of audio at 48kHz or 32x32 audio channels at 96kHz.
When a Network IO stagebox is connected to the network, it must be configured in the I/O
page. Press the Dante Configuration icon on the right hand side.
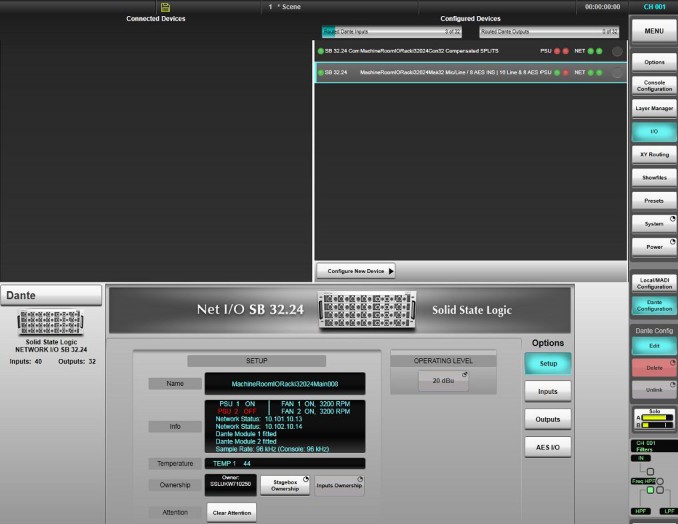
All Dante devices connected to the network are shown in the left panel of the configuration page. To configure a device, press Edit on the right hand side of the display and drag it from the left panel onto the + sign on the right panel. Note: The + sign will appear once you begin to drag a device.
Once a device has been moved into the right panel it will appear in the routing menu.
Appendix A - Configuring a DHCP Dante Network for Live consoles
It is only possible to configure the Primary Dante network as DHCP. If both Primary and Secondary networks are set to DHCP, the console automatically allocates a 169.254.x.x address to both primary and secondary networks, which places both Primary and Secondary subnets in the same range which is must be avoided.
Note: If configuring the Connectivity port apply a Fixed IP address.
Setting the IP addresses of the console
Set the Primary network set as DHCP with an address in the 169.254.x.x range with a 255.255.0.0 subnet. The Secondary address is set to an arbitrary Fixed address in the 172.31.x.x range with a 255.255.0.0 subnet mask. Press and hold the Apply button after making any changes.
Configuring settings this way allows for any device connected to the network in DHCP mode to be allocated an address in the correct range for both primary and secondary networks and connect to the console.
Setting the Dante Audio Network IP addresses
The IP address for the Dante Audio Network will need to be configured as DHCP in Dante Controller.
As shipped from the Factory the Dante Audio Network has a FIXED IP address in the range of
10.101.x.x for Primary and 10.102.x.x for Secondary. Give your computer a Fixed IP address and connect it to your Console's Dante Primary Port.
Open Dante Controller and Double click on the device to bring up the configuration window and navigate to the Network tab. Set the IP addresses as shown below.
Click Reboot to complete the setup.
Next ensure console the Dante Device shown in the console and Dante Controller is the same. Refer to steps 2 and 3 for guidance.
Power cycle the console and check for correct operation.